
Setting Up Exact Audio Copy
This is how I have my EAC install set up. This tutorial applies to EAC 1.0b3 and up. I suggest you get the latest version, here.
Current Exact Audio Copy version: Version 1.6 (Released Nov. 2020)
"Big W" log tool version compatibility: Up to version 1.6 (as of Nov. 20, 2020)
Setting Up EAC to Make Perfect Lossless Rips
If I make no mention of certain tabs or options, it is because you don't need to do anything about them or in some cases they are left at your discretion. Otherwise, set each setting as pictured / described.
EAC -> EAC Options, Extraction Tab
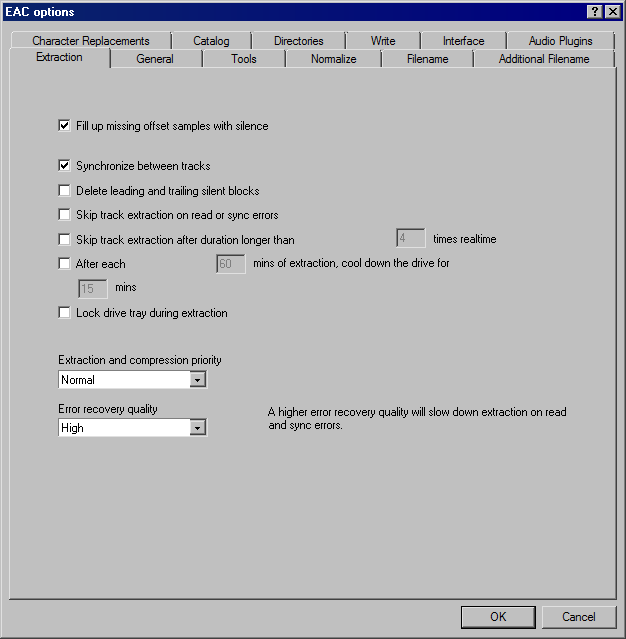
You may or may not choose to lock your drive during the extraction. However, EAC is very buggy. If you attempt to rip an unreadable CD and cannot abort it, thus you decide to kill the process, the CD will be locked inside the disc drive until you reboot your computer. Otherwise, I have nothing to add; just copy the settings.
EAC -> EAC Options, General Tab
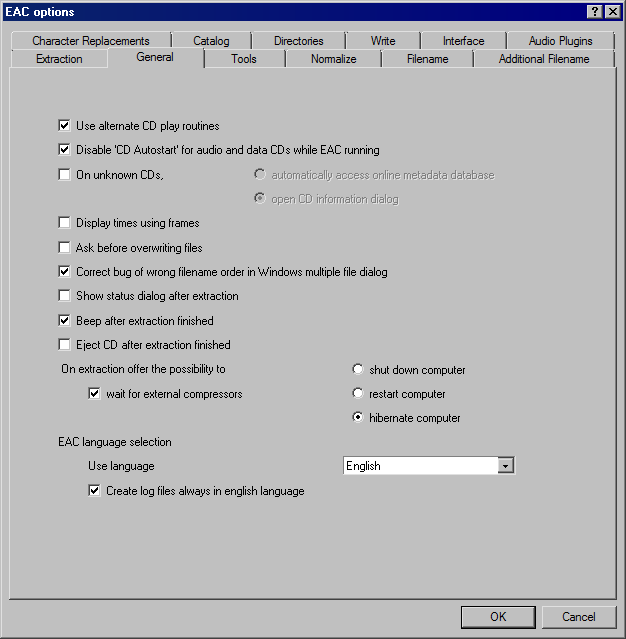
You can check "On unknown CDs..." and have EAC do something for you, but I always prefer doing things manually as it cuts down on mistakes. Otherwise, I have nothing to add; just copy the settings as pictured.
EAC -> EAC Options, Tools Tab
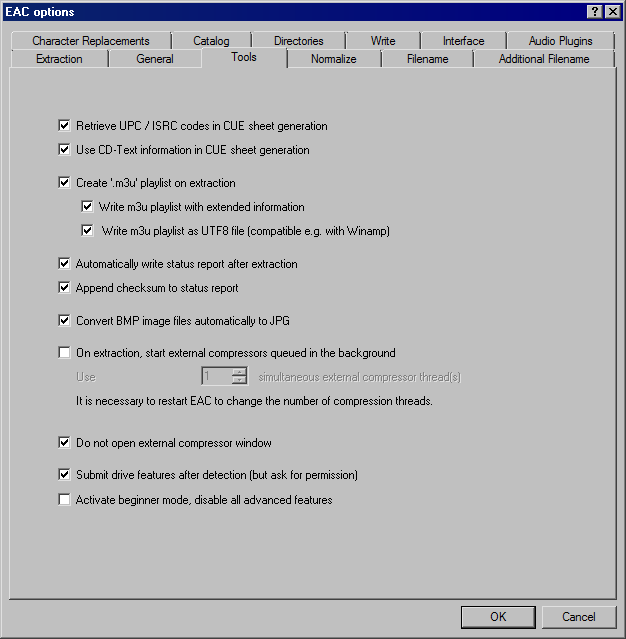
"Write .m3u playlist as UTF-8 file" will generate .m3u8 playlists which support Unicode. It's preferable to turn it on; especially if you are to rip Japanese CDs and such. Otherwise, I have nothing to add; just copy the settings as pictured.
Note: EAC writes .m3u8 playlists with commas replaced with periods in the upper line of each track. You can edit them in a text editor; if you don't, audio players will skip over the tracks with mismatched titles.
EAC -> EAC Options, Normalize Tab
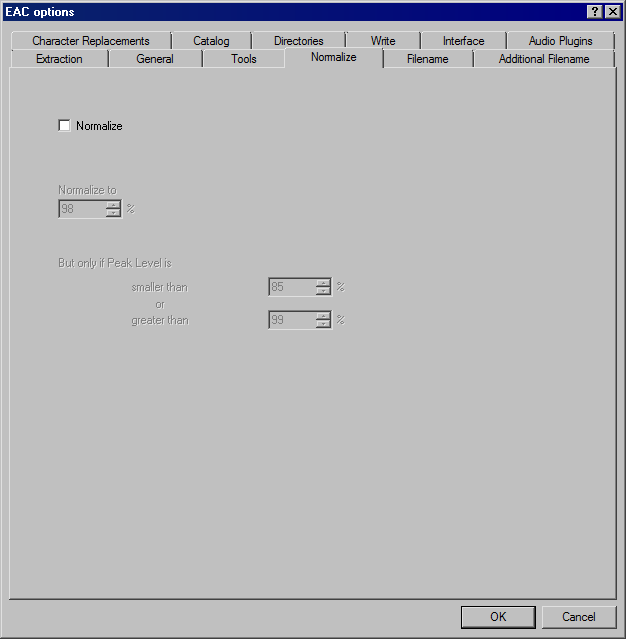
NEVER, EVER use this.
EAC -> EAC Options, Filenames Tab

This is up to you. The pictured settings will...
* With a single artist, the filename will look like 01. [Song Title].flac
* With multiple artists, the filename will look like 01. [Track Artist] – [Song Title].flac
You can have it to create folders automatically, but it is best for you to create them manually. Less complicated.
Setting Up Your Drive
EAC -> Drive Options, Extraction Method Tab
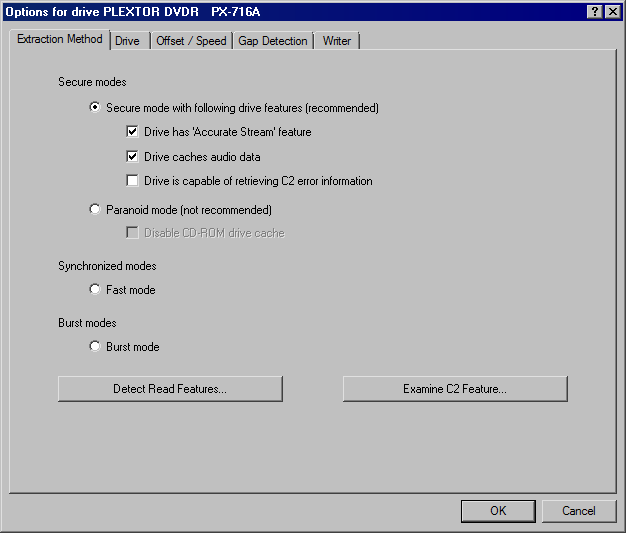
Click "Detect Read Features..." While this is ongoing, do not do anything on your computer. Once finished, your drive likely will be capable of retrieving C2 error data. Do NOT use the feature even if it says it is capable. Most drives have terrible implementation of it.
The other two features, unless you use a very old drive, ought to be supported by your drive and should be checked.
Also, ALWAYS use secure mode!
EAC -> Drive Options, Drive Tab
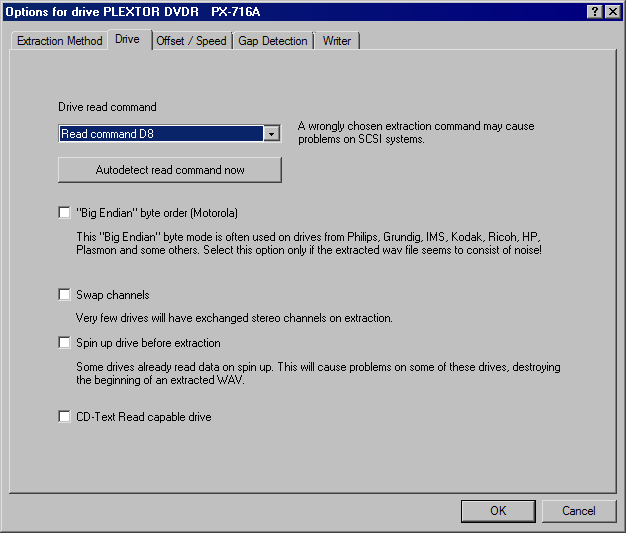
Click the Autodetect button to get the command that is right for your drive. That is all. The other options should not be checked.
EAC -> Drive Options, Offset / Speed tab
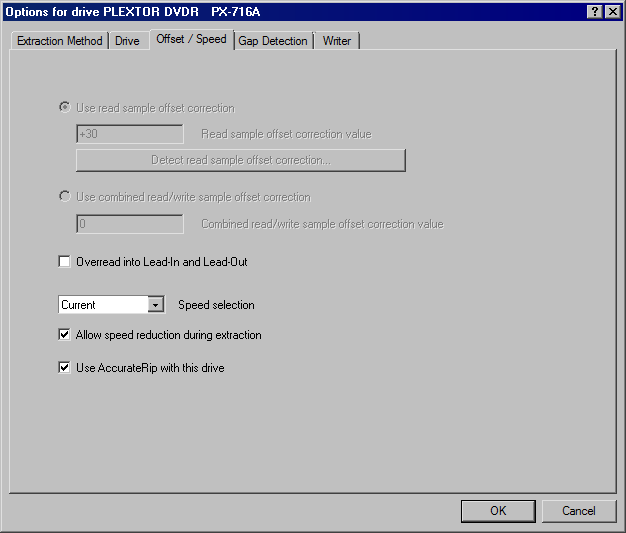
These two options should be checked as pictured.
"But 'Use AccurateRip with this drive' is greyed out!"
To enable this, click OK to save your settings, then insert a very popular CD by a popular artist. This is called a Key Disc. Once you have done so and the disc has loaded, this popup will appear:
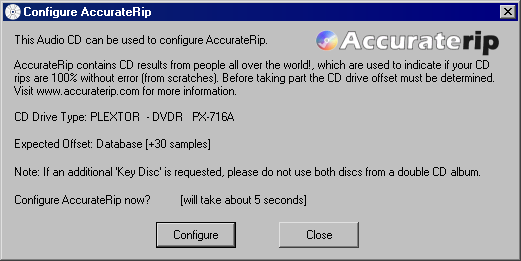
Then click "Configure".
If you have no suitable CD, I highly encourage you to go online and buy one, whether new or used. Here is the page pertaining to Key Discs: http://www.accuraterip.com/keydiscs.htm
It is important that you configure this, as it will check your rip's accuracy with other rips online and write the result in the log.
Configuring it manually will not make this box checkable.
EAC -> Drive Options, Gap Detection tab
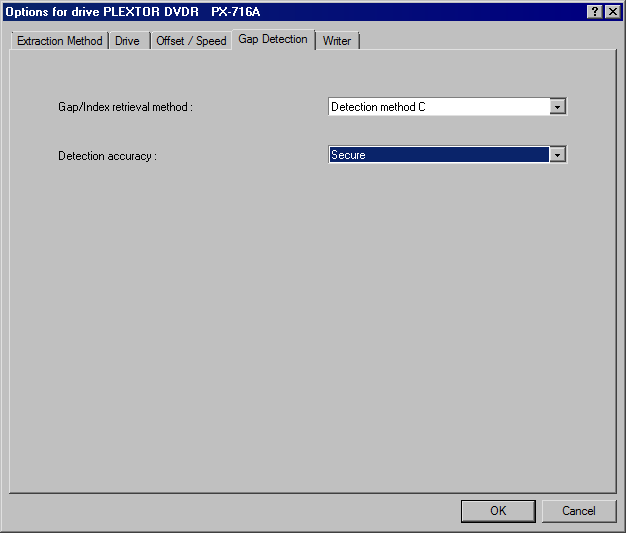
Aside from the the second drop-down menu, I cannot tell you what option to choose. If, when you detect gaps, EAC freezes, then you must try another detection method. It does not matter if it's A, B or C; just use the one that works 100% of the time for you. Personally, method C causes my drive to make the least noise, and makes it possible for it to detect gaps on very old or damaged discs.
Setting Up Proper FLAC Compression
EAC -> Compression Options, External Compression Tab
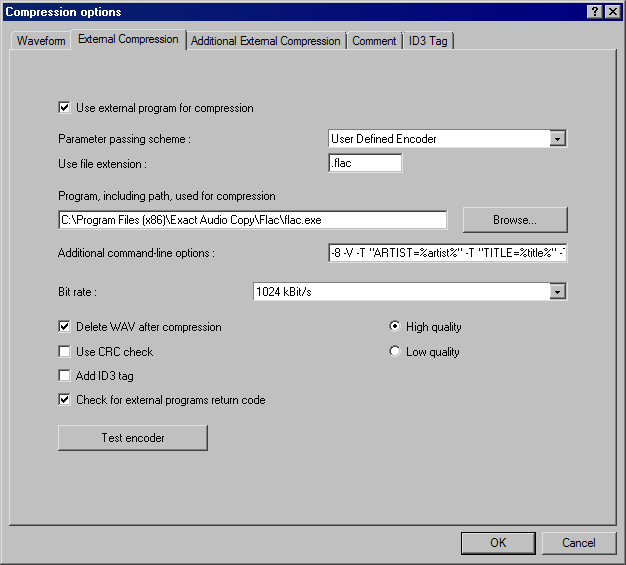
EAC 1.0b3 and 1.0b4 should already have the flac.exe in its folder ready for use; 1.0b3 comes with FLAC 1.2.1 and 1.0b4 with 1.3.1.
Copy and paste these additional command-line options:
-8 -V -T "ARTIST=%artist%" -T "TITLE=%title%" -T "ALBUM=%albumtitle%" -T "DATE=%year%" -T "TRACKNUMBER=%tracknr%" -T "GENRE=%genre%" -T "PERFORMER=%albuminterpret%" -T "COMPOSER=%composer%" %haslyrics%--tag-from-file=LYRICS="%lyricsfile%"%haslyrics% -T "ALBUMARTIST=%albumartist%" -T "DISCNUMBER=%cdnumber%" -T "TOTALDISCS=%totalcds%" -T "TOTALTRACKS=%numtracks%" -T "COMMENT=%comment%" %source% -o %dest%
If for any reason this site's formatting should screw up the command in the future, you may copy it from this raw text file.
Follow the picture for the rest.
EAC -> Compression Options, ID3 Tag Tab
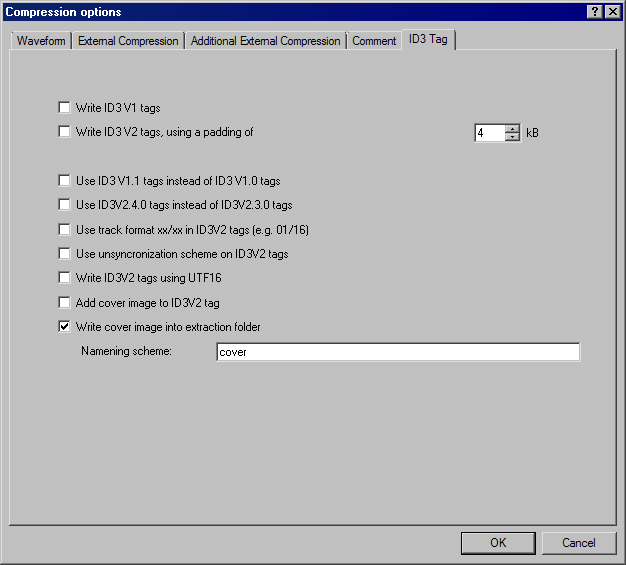
Do as shown.
EAC: Preparing for Ripping, Part 1
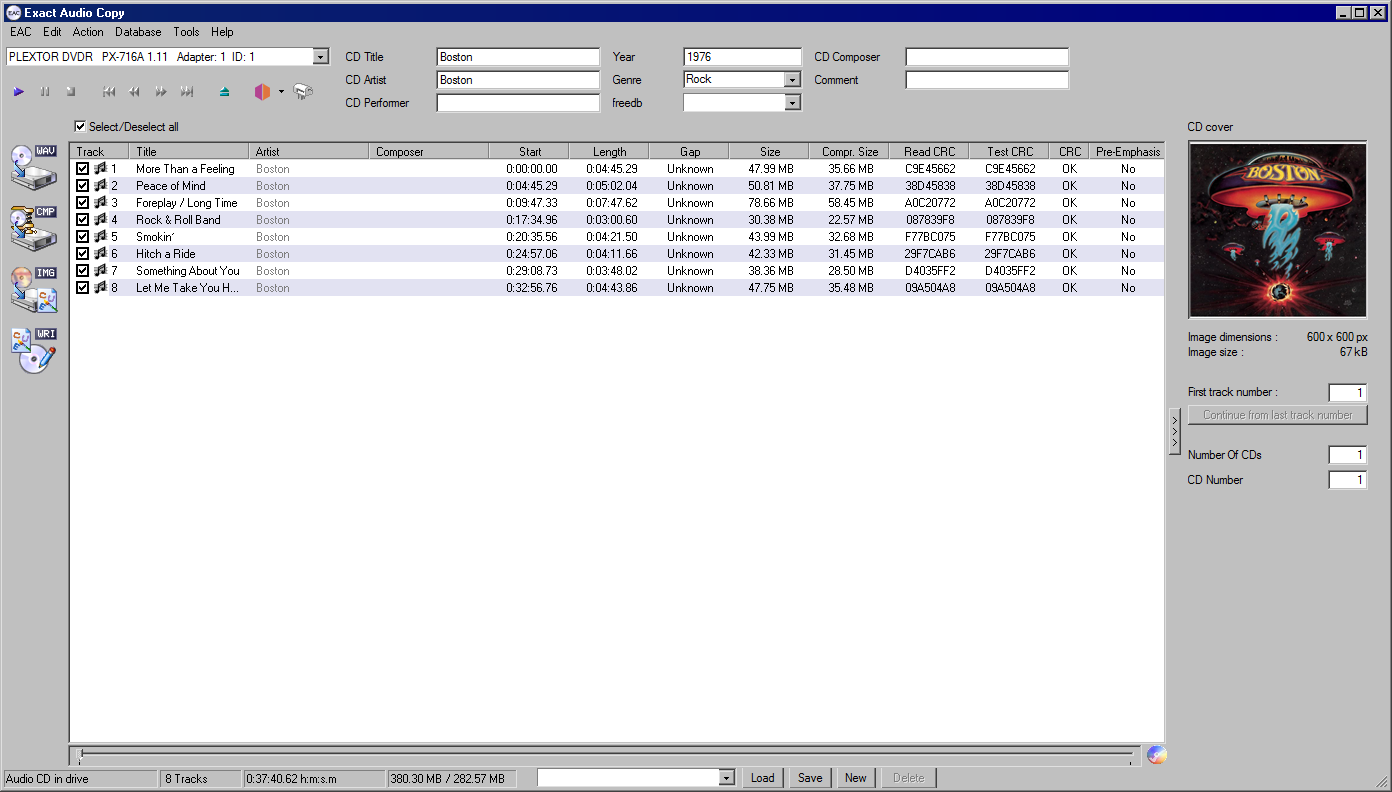
This image demonstrates what EAC will look like when a CD with a single artist is inserted and metadata is filled in.
* Tag the album as you wish. You may attempt to fetch the tags and album cover from a metadata provider; I recommend MusicBrainz.
* Do NOT embed cover art files in FLAC files! If someone does not want that, when removed, FLAC does not remove the padding which was used to store the file! One has to use the metaflac.exe (and a complicated setup...) to remove that padding. So, just let the cover be added as a file in your folder (folder.jpg, front.jpg, cover.jpg, etc...)
EAC: Preparing for Ripping, Part 2
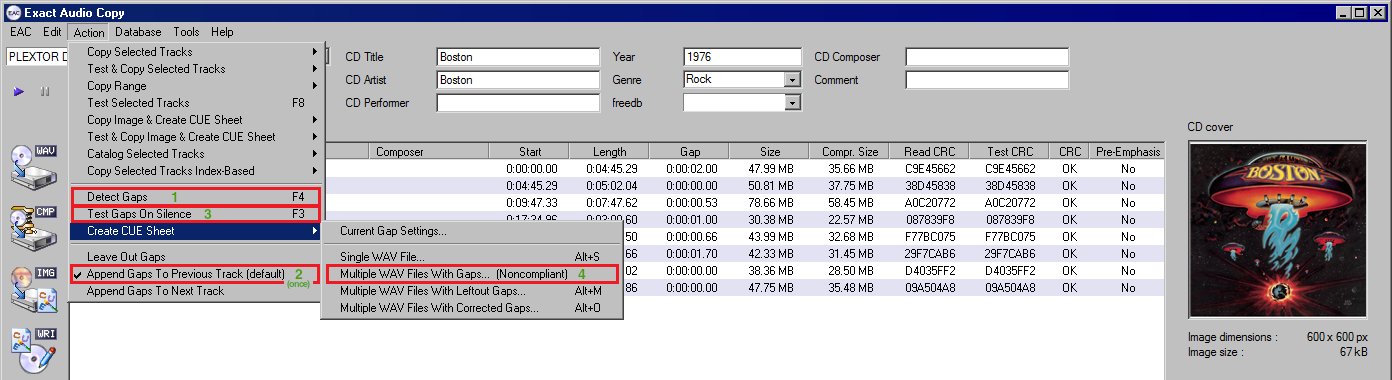
Follow the order shown in the image.
Step no. 2 is required only once. It may be already checked by default, but it somehow doesn't register on the log unless you reclick it once.
For step 4, at the end of the process, you will save the CUE to the folder where your album will go.
EAC: Begin Ripping
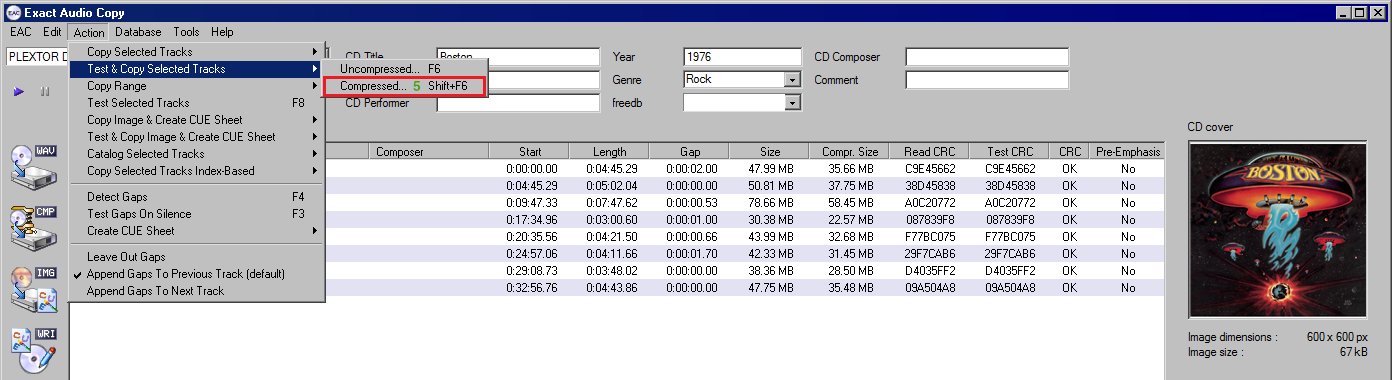
Now, do that. It may take quite a bit of time, depending on the length of the CD and the disc drive used. An average album can take as long as an hour to rip on a laptop drive, but my old Plextor can take less than twenty minutes with a good CD.
Do NOT range rip! If the tracks are split on the CD, they are to be ripped split!
Extra Information
EAC ensures that a disc is gone-over again and again until the data is read as accurately as is physically possible: this means that even laptop drives with jitter can produce accurate rips. However, the one thing that can cause a rip not to pass AccurateRip is heavy damage by extensive scratching, resurfacing, or rot; especially if there are holes in the shiny foil. Sometimes a disc with a great deal of surface scratches, or deep scratches which are not on the recorded area, will rip just fine; other times, a disc with no visible scratches at all will not rip because it has been resurfaced. In cases of properly heavy damage the data simply is not there to be read.
MusicBrainz is my preferred metadata provider, because unlike the others, it has standards for tagging consistency and cover size (a medium-sized cover usually will be 600x600). It does not have information or covers for all the CDs I've ripped, but you can add to it, and regardless of which provider you use, I recommend following MusicBrainz' Style Guidelines and especially their English-language Style Guidelines.
Most CDs from 1995 on up to the past decade have extremely poor mastering and remastering, with very high loudness and digital distortion. The best CDs of analog-recorded music are those mastered before 1995, and recent releases by well-managed labels such as ABKCO and some Japanese groups. Your perfect CD rip is only as good as the original CD!